Changing A Host Server: CentOS
When changing the IP address, Netmask, Domain, or Hostname of the server there are several steps that must be followed.
To Change the IP Address, Netmask, DNS:
The first thing to remember when changing any IP address of a Host is that all the changes below must be made before you can reboot the Host. Otherwise you may not be able to finish properly.
Network-Scripts
Once you have logged in to the Host use the command below to change directories,
cd /etc/sysconfig/network-scripts
This directory has all the network information for the Host, however, you will only be focused on two files:
'ifcfg-eth0'
and
'ifcfg-eth1'
You will need to cat these files to determine which one is the current Ethernet configuration.
cat ifcfg-eth#
Once you have determined which file needs to be changed you will need to make a copy of the file for a backup using the command below:
cp {filename} {filename}.bak
Note: Do not include the {} brackets, this is only used as a separator in this document.
Now that a backup is made you can use the text editor VI to make changes to the original configuration file and update to the new IP address, Netmask address, or DNS address;
vi ifcfg-eth#
To insert text, use the arrow keys to scroll to where you want to insert text and press < i > this will let you input characters.
When you are finished making changes press the < esc > key to exit the input editor and then type the following:
:wq <enter>
This will let you write your changes and quit the program, thus saving your file. If you have made a mistake and do not want to save your changes, press the < esc > key and use the command:
:q! <enter>
This will cancel any changes you have made to the file and exit.
Additional File to change for the DNS
Resolv.conf
The secondary place the DNS IP address lives is in the ‘resolv.conf’ file. From the previous ‘network-scripts’ directory, run the command below.
cd /etc
From here you can run the ‘ls’ command to list the file options in the directory. You will now want to make a backup of the resolv.conf file just as you did for the ‘ifcfg-eth#’.
cp resolv.conf resolv.conf.bak
Once the backup is created you can use VI to edit the original file:
vi resolv.conf
Once finished, save the changes and quit.
/etc/hosts
The next file to update for the IP address of the host is the /etc/hosts file. Using VI, edit the hosts file and update the old server IP host with the new one:
vi /etc/hosts
Note: If the DCMs are changing as well, update their IP addresses now.
Once the changes are saved you can exit out of the file.
MySQL
The last place to edit will be the 'user' table in MySQL. The easiest way to accomplish this would be to use MySQL Query Browser or MySQL Work Bench but we will cover doing it through the command prompt as well.
Using Query Browser/Work Bench
Open Query Browser or Work Bench and run the query:
use mysql;
and then on another line:
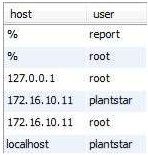
select host,user from user;
This should populate several lines under the columns "Host", "User", "Password" and rows such as "local host", the hostname of the server, the IP address of the server. It should look something like this:
Once you are sure this is the table you wish to edit use the following query to update the table with the new IP address:
update user set host = 'new.IP.Add.Ress' where host = 'old.IP.Add.Ress' ;
Remember to leave the single quotes and once you execute the program, at the bottom you should see that 'Two rows have been effected'.
Run the select host,user from user; query again to make sure that the rows were properly changed.
Using the SSH / Telnet Session
If this needs to be done in the Telnet session use the following command to get in to the MySQL tables;
mysql -uroot -ppstar focus2000
This will change the command prompt to display the following:
mysql >
Here you will enter in the commands stated above, remembering to hit enter after every ‘;’.
When you are finished making your changes type the command below to leave the MySQL tables
exit;
Finishing the IP addressing
If everything has gone correctly at this point, you should now be able to reboot the PlantStar Host. When it comes online again you should be able to connect using the new IP address.
Note: This can take several minutes.
To ensure that all changes were made correctly, please check that you can connect to the host using the Workstation Software.
Changing the Host Name (If Needed):
Network-Scripts
Once you have logged in to the Host,
cd /etc/sysconfig/network-scripts
This directory has all the network information for the Host, however you will only be focused on two files:
'ifcfg-eth0'
or
'ifcfg-eth1'
You will need to cat these files to determine which one is the current Ethernet configuration and Host Name.
cat ifcfg-eth#
Once you have determined which file needs to be changed you will need to make a copy of the file for a backup using the command below:
cp {filename} {filename}.bak
Note: Do not include the {} brackets, this is only used as a separator in this document.
Now that a backup is made you can use VI to make changes to the configuration file.
vi ifcfg-eth#
Focus on the line ‘Hostname= ‘. By default, the Hostname will be:
plantstar.syscon-intl.com plantstar
The line that you want to change here is the line corresponding with the current IP address of the host.
After your change is complete, save the file and quit.
/etc/hosts file
The next file to update is the /etc/hosts file. Using VI, edit the hosts file and update the old server Hostname with the new one.
vi /etc/hosts
Again, you will only want to focus on changing the ‘plantstar.syscon-intl.com’ line.
Once the changes are saved you can exit out of the file.
/etc/f2k_env
The next file to change in the /etc directory is the /etc/f2k_env file. Using VI, editthe f2k_env file and update the old server hostname with the new one.
vi /etc/f2k_env
Again you will only want to focus on changing the 'plantstar.syscon-intl.com' line.
Once the changes are saved you can exit out of the file.
Hostname
You will also need to update the hostname in the hostname file. To change this, you will only need to be in the command prompt and to type the following command:
hostname {new Hostname}
Note: Do not include the {} brackets, this is only used as a separator in this document.
To make sure this change took, use the command below to see that it was changed properly:
hostname
MySQL
The last place to edit will be the 'user' table in MySQL. The easiest way to accomplish this would be to use MySQL Query Browser or MySQL Work Bench but we will cover doing it through the command prompt as well.
Open Query Browser or Work Bench and run the query:
use mysql;
and then on another line:
select host,user from user;
This should populate several lines under the columns "Host", "User", "Password" and rows such as "local host", the hostname of the server, the IP address of the server. It should look something like this:
Once you are sure this is the table you wish to edit use the query to update the table with the new IP address:
update user set host = ‘new Hostname’ where host = ‘old hostname (plantstar)’ ;
Remember to leave the single quotes and once you execute the program, at the bottom you should see that 'Two rows have been effected'.
Run the select host,user from user; query again to make sure that the rows were properly changed.

Changing the Mysql Tables through SSH / Telnet
If this needs to be done in the Telnet session use the following command to get in to the MySQL tables;
mysql -uroot -ppstar focus2000
This will change the command prompt to display the following:
mysql >
Here you will enter in the commands stated above, remembering to hit enter after every ‘;’.
When you are finished making the desired changes type the command below to leave the MySQL tables
exit;
Finishing the Hostname Change
If everything has gone correctly at this point, you should now be able to reboot the PlantStar Host.
Note: This can take several minutes.
To make sure that all changes were made correctly, please check that all your machines are running properly and ensure that you can connect to the host using the Workstation Software.
If for any reason your system is not performing as expected, please contact ‘support@syscon-intl.com’ for assistance, in the e-mail please list all steps that were taken and if you are encountering any errors.