DCM Configuration
This document will walk you through the steps of the initial configuration of a DCM. The DCM needs to be configured in order to talk to a host server and perform correctly. This process is the first thing you will complete after the BIOS settings have been saved and the DCM has rebooted. You may also follow these steps to change the configuration at any time.
You will notice that if the DCM has not been configured, directly above the 'login' prompt, a message will read 'DCM not configured!'. Login to the DCM using the login 'root' and the password 'pstar'. At the command line, type 'pstar_setup' and hit the Enter key. This will bring you to the 'Pstar Setup' screen titled 'Current Configuration'. To change the settings, follow the steps outlined below.
Current Configuration
Unconfigured DCMs will have a default setting in each category. The 'Current Configuration' screen will look similar to the below example:
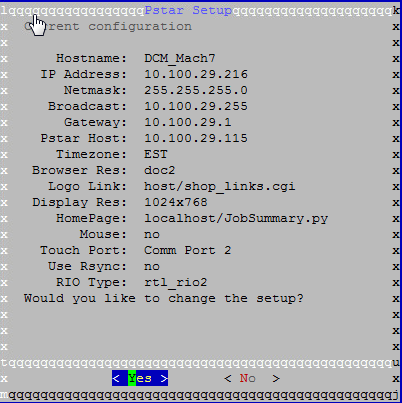
At the bottom of the screen, you are asked, 'Would you like to change the setup?'.
Choose < Yes > and hit the Enter key.
Set Hostname
Set the DCM name desired/designated by the IT department. The name can be a combination of numbers and letters. Use underscores instead of spaces between words in the hostname.
Enter IP Address
Set the IP address desired/designated by the IT department. All IP addresses consist of only numbers. These numbers are formed into four groupings, with a period (.) separating each grouping. Ex: 123.45.678.90
Netmask
Set the Netmask IP address designated by the IT department. For burn-in/testing at PlantStar, the Netmask address is 255.255.0.0. This should already be set by default.
Broadcast address
Set the broadcast IP address designated by the IT department. For burn-in/testing at PlantStar, the Broadcast address is 172.16.255.255. This should already be set by default.
Default gateway
Set the Default gateway IP address designated by the IT department. For burn-in/testing at PlantStar, the Default gateway address is 172.16.0.20. This should already be set by default.
Plantstar Host Address
Set the IP address of the Plantstar server designated by the IT department. For burn-in/testing at PlantStar, the Host Address is 172.16.10.11.
Browser Screen Config
You may select from two resolution options:
1. Low resolution Browser screens 800x600
2. High resolution Browser screens 1024x768
You will choose option 2. This should already be selected by default.
Link for the Syscon Logo in the DCM Menubar
You may select from five options:
1. Host Shopfloor Selection Screen
2. Host Shopfloor Selection (1024x768) with pictures
3. DCM Job Summary Screen
4. User specified
5. Use Current URL: host/shop_links.cgi
Your selection will depend on the customer's specific requirements for the DCM's display. For burn-in/testing at PlantStar, you will choose option 1. This should already be selected by default.
DCM Display Resolution
You may select from four options:
1. Blind Cim RTL
2. 800x600 Advantech 12" Display
3. 800x600 Cim RTL with 12" Display
4. 1024x768 Cim RTL with 15" Display
Your selection will depend on the size of the monitor that will display this DCM. Most of our monitors are option 4. If it will not be displayed on a monitor, you will choose option 1.
Enable Rsync Server
Always select option #2 to disable Rsync.
Select Rio type
You may select from two options:
1. rtl_rio2 - Modular rio card
2. rtl_dio - Digital io card
Your selection will depend on the type of A/D board in the DCM. For the current A/D boards, you will choose option 1.
New configuration
You will be shown the entire setup you have selected, and asked if you would like to save this new setup. To save your changes, select < Yes >.
Reboot
Once your setup has been saved, type 'reboot' at the command prompt to reboot the DCM. Upon boot, the login prompt should now include the hostname you set for the DCM, indicating that the changes you've made have successfully saved.