The PlantStar Process Journal program is a web-based program designed to provide the shop floor personnel with a method to record changes made to a process being monitored by the PlantStar system. These instructions are designed to provide an overview of the Process Journal program and how to view and create Process Journal tickets. Screen shots are used for clarity.
Each record entered through the Process Journal program will from this point forward be referred to as a ticket. The operator creates a ticket to record a particular event. Tickets can be individual, standalone objects or they can be linked to other, related tickets. All menus and buttons on the Process Journal screens have been designed for easy use by operators working on touch screens with gloved hands.
- Show Tickets
The show tickets web page displays all the existing Process Journal tickets that have been created. The menubar in the top frame on this page provides a number of different

options to the user.
Create New Ticket button takes the operator to a page where new tickets can be created and saved in the database.
- Show Tickets links back to this page and is one of the methods available of refreshing the output on the Show Tickets screen.
- The menu in the center of the top line allows the operator to filter the existing tickets by the date the ticket was created. The required date format is indicated in the text fields. If the operator enters a Start Date and does not enter an End Date, then the tickets displayed will be all tickets created from the start date up to the current date.
- The Admin button will take the operator to the login screen for the admin pages. Only users that have Administer Privileges defined in Config will be able to login and access the Admin section.
- The Syscon/PlantStar image on the right hand side of the top line links to the Shop Links page.

The bottom half of the menu bar allows the user to sort and / or filter the tickets on certain columns and the values they contain. The buttons in the Sort row will sort the tickets based on the column names on the buttons. For example: clicking on the TicketDate button will cause all tickets to be sorted by the date the ticket was created. Clicking on the TicketDate button a second time will reverse the sort order. The rest of the buttons in the Sort row work in the same manner on different data columns.
The Filter row at the very bottom of the menubar allows the operator to filter the display in order to reduce the number of tickets displayed on the screen. Each filter menu is matched to the column named in the button above it. For example: the menu under the MachName button will list all of the machines that currently have tickets defined. Selecting a machine name from this menu and then clicking the Filter button on the right hand side of the menu will result in only tickets relating to that particular machine appearing on the screen.
You can filter by date, as well as filter and sort by column, all at the same time. However, you cannot filter by more than one column at a time. If you select a value to filter by from the Tool menu and then select a particular Shift, then the results will be filtered by Shift only. Should you desire to stop filtering or sorting the tickets and return to the default ticket view, clicking the Reset button in the Filter menu row will reset all the menu values to their defaults and reload the page so all tickets will be displayed again.
The bottom two thirds of the Show Tickets screen is divided into two frames. The bottom frame displays the standalone tickets currently in the system. The middle frames
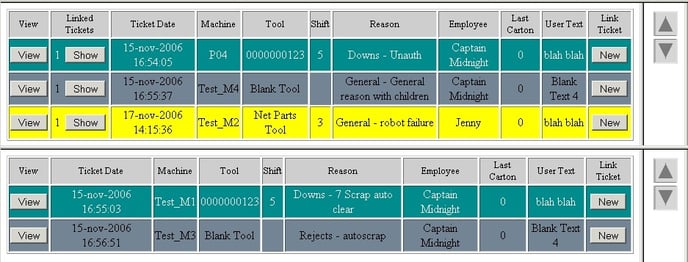
displays tickets that are linked to other tickets in the system.
Note that the top frame here has an extra column that the bottom frame does not have. “Linked Tickets” indicates the number of tickets that are linked to the ticket displayed on the screen. With each group of linked tickets displayed in this frame, the only ticket showing is the first ticket created. By clicking on the “Show” button you will be able to see the other tickets that have been linked to the parent ticket. In both frames the “View” button allows you to see more detailed information about that particular ticket. Also, the “New” button will start the process of creating a ticket and link the new ticket with the existing ticket.
The large arrow buttons on the right hand side of each frame allows the operator to scroll that frame without the need for the standard scrollbar.
- Create New Tickets
The series of screens involved in creating a new ticket can be reached in several different ways. The first is by clicking the “Create New Ticket” button that appears on the standard menu at the top of each page. Doing so will take the operator to the machine selection screen.
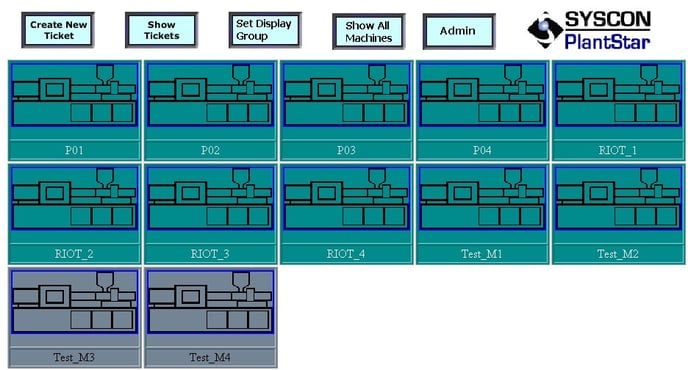
This screen shows all machines that are currently defined on the shop floor. The different colors of the machine images indicates the current state of the machine. See PlantStar Help Documentation for the definitions of each color. Please note that two buttons on the menu, “Set Display Group” and “Show All Machines” do not appear on other menus. These functions are discussed in detail in the Process Journal Administrator's manual. Briefly, “Set Display Group” allows the administrator to choose a particular display group for each DCM to use, in which case when the operator arrives at this screen they will only see the machines defined in that display group. “Show All Machines” overrides the settings specified in “Set Display Group” and shows all the machines defined on the shop floor.
Once the operator has chosen the machine they wish to create a ticket for, the next screen displays information related to the selected machine and a menu of categories for the ticket being created.
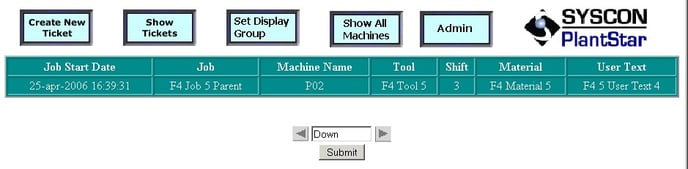
The menu consists of five ticket classifications to choose from. Down, General, PVAR, Profile and Reject. With the exception of General, all of the categories in the menu correspond to standard reason sets in the PlantStar database. These sets are defined and maintained through the standard PlantStar configuration program. The General category is managed through the Process Journal administration pages and is intended to provide a method to define reasons that do not fit under the other categories.
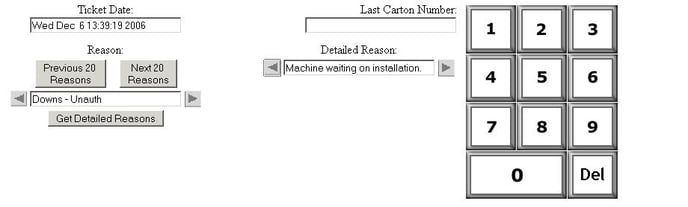
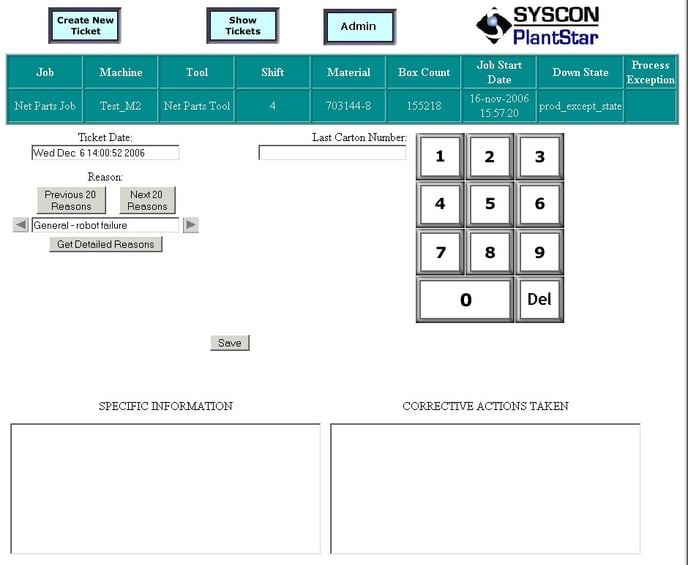
Once the operator has selected the desired category, the input screen will be loaded. This screen consists of information already gathered about the machine and the job in question and gathers more detailed information from the operator.
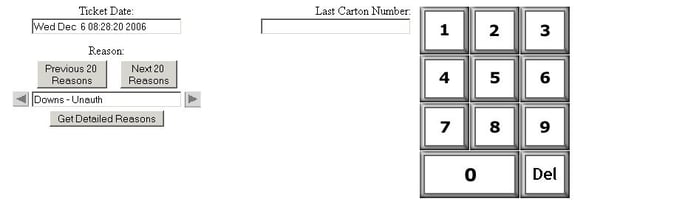
The field “Last Carton Number” can be left blank if that information is not important. The “Reason” field lists all of the reasons defined for the category that the operator chose on the previous screen. Since the list of defined reasons can be quite large, the set is broken down into smaller subsets of twenty reasons each. The arrow buttons to the left and right of the text field can be used to select a reason from the current reasons, while the two large buttons above the text field are used to move to a different portion of the reason set. If the administrator has defined detailed reasons (see the section on Administration functions) then once the reason has been selected from this menu the operator will be able to select from additional reasons by clicking the “Get Detailed Reasons” button.
At this point the operator has more detailed reasons to select from, providing the ability to be very specific as to the nature of the problem being recorded. In the event that no detailed reasons have been defined, the operator will see this on the screen:
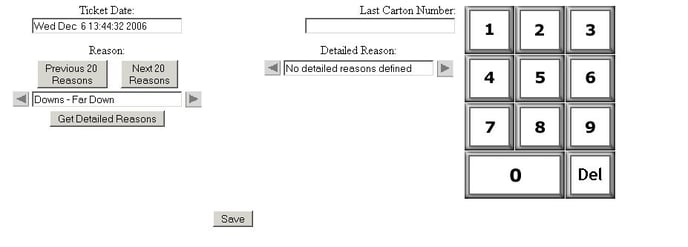
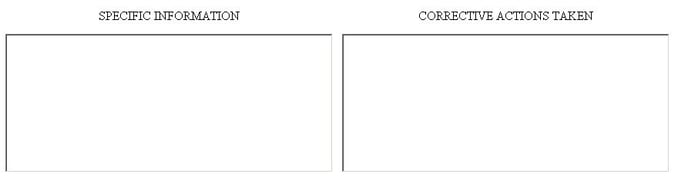
In this case a detailed reason will not be saved with the ticket and only the first reason selected on this screen will be stored. Finally, at the bottom of the screen are two text boxes where the operator can record longer descriptions of the problem as well as the actions taken to correct it.
 Once all information has been saved, clicking the save button will take the operator to the final step in the ticket creation process.
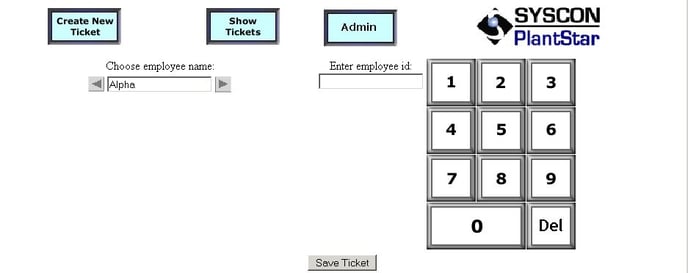
On this screen the operator must choose their name from the menu on the left and enter their employee ID using the keypad on the right side of the screen. The names and IDs match the information in the labor tracking section of PlantStar config. Once that is complete, clicking the save ticket button will save the ticket to the database and return the operator to the Show Tickets screen, where the new ticket will be visible. The ticket will not be saved until the operator has correctly entered their name and ID. If either piece of information is incorrect the a message will be printed on the screen and the operator will have to input their information again.
As mentioned earlier, there are two methods of creating a new ticket. The first method creates a standalone ticket that is not linked to any other ticket in the database. The second method creates a ticket and links it to one or more existing tickets. This is done from the Show Tickets screen. 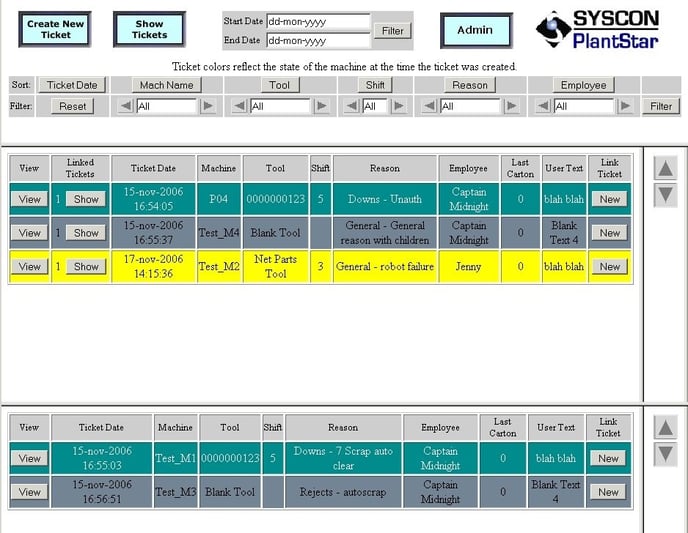
Notice that in the ticket display frames, each ticket has a “New” button at the right hand side of the screen. Clicking this button will take the operator into the ticket creation process just like the “Create New Ticket” button, with one significant difference. Choosing the “New” button will take the operator directly to the input screen seen below. Because we are linking the new ticket to an existing ticket, there is no need to force the operator to select the machine and category for the ticket. That information is pulled from the existing ticket and used with the new ticket.
From this point on the process is exactly the same as the creation of a new ticket. The new ticket will be linked to the existing ticket(s) and all of the linked tickets will appear in the middle frame on the Show Tickets screen.